
1.1 Welcome to Ultimate Content Machine (UCM)
Stop staring at a blank cursor. Ultimate Content Machine is a dedicated SaaS ecosystem designed to take the friction out of digital marketing for SMM managers, busy small business owners, and indie hackers.
UCM doesn’t just help you “write posts” — it empowers you to build a content engine. By combining your unique brand identity with advanced AI and proven marketing frameworks, we turn hours of brainstorming into a structured, automated workflow.
The UCM Philosophy: We believe content creation should be about strategy, not just typing. Our mission is to provide the systems you need to scale your presence without burning out.
Step 1: Connection & Authentication
To ensure your data remains secure and your sessions stay synced, UCM uses Google Authentication.
- Action: On the landing page, use the Login with Google button.
- Note: This automatically creates your workspace and prepares the system for your first brand profile.
Step 2: AI Configuration
UCM leverages Google’s advanced neural engines to generate high-quality content. To power this, you need to connect your own free API key.
- Locate your key: Click the Google AI Studio link provided in the setup screen.
- Generate & copy: Create a free API key and copy it to your clipboard.
- Input: Paste the key into the Gemini API Key field.
Why is this required? This key acts as the “fuel” for the neural engine, allowing the app to process complex requests and generate human-like text directly within your dashboard.
Step 3: Defining Your Brand Identity
To create content that actually converts, the AI needs context. Fill in the following fields to ground the system in your specific reality:
| Field | What to Enter | Example |
| Brand Name | The public name of your company or project. | Muzantrop |
| Your Role | Your specific position or perspective. | Solutions Architect |
| Industry/Niche | The specific sector you operate in. | SaaS for Translators |
| Target Audience | Who exactly are you trying to reach? | Freelance Language Professionals |
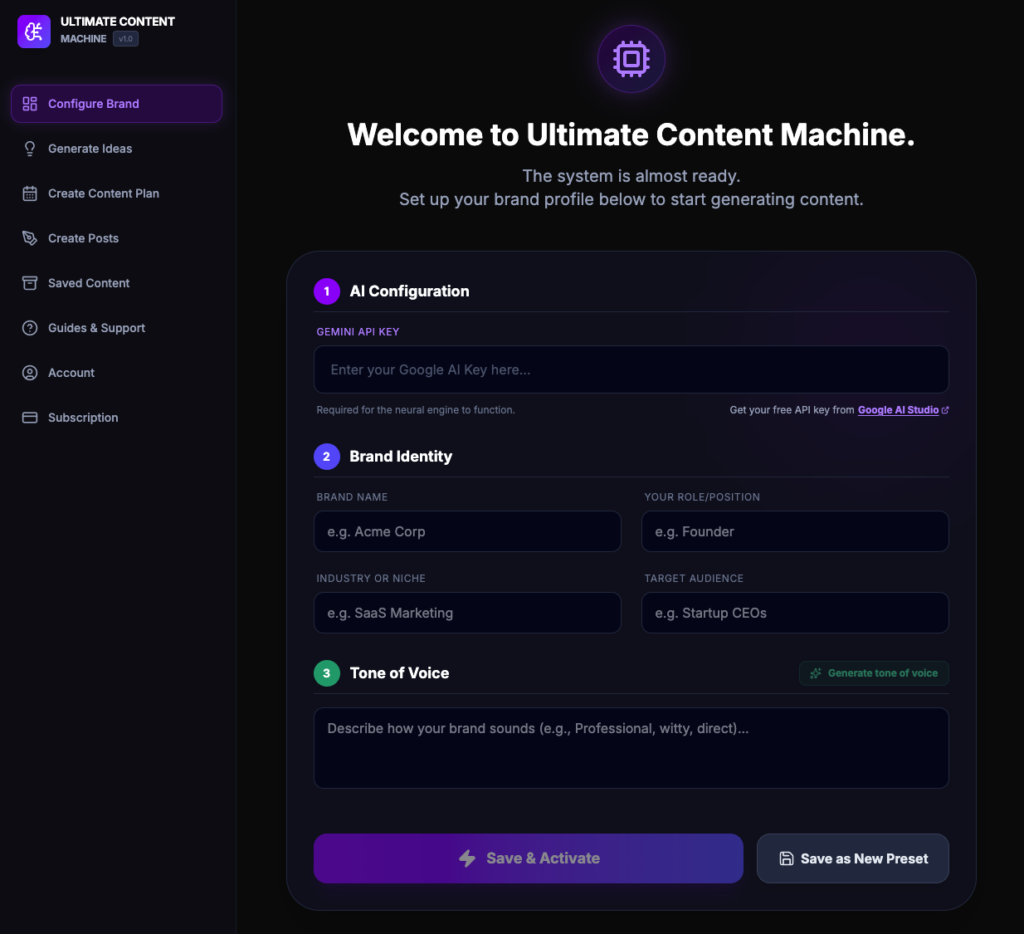
Step 4: Setting the Tone of Voice
This is where your content gets its personality. You have two ways to define how you “sound”:
- Manual entry: Describe your style using adjectives (e.g., “Professional yet witty, direct, and avoiding corporate jargon”).
- AI generation: Click the Generate tone of voice button. UCM will analyze your Brand Identity and Role to suggest a scientifically crafted persona that resonates with your target audience.
Step 5: Saving & Activating
Once your profile is complete, choose how you want to proceed based on your plan:
A. Save & Activate
This sets the current information as your Active Profile. All content generated from this point forward will use these settings.
B. Save as New Preset
If you manage multiple projects or clients, you can save this configuration as a dedicated template.
- Free version: You can save one primary preset and edit it whenever needed.
- Pro version: Unlock Unlimited Brand Presets. This allows you to toggle between different brands (e.g., a personal blog vs. a corporate SaaS) in a single click without re-entering data.
1.2 Active Profile Overview
The Active Profile block represents the specific identity the AI is currently “wearing.” Any ideas or content generated while a profile is active will be strictly tailored to these settings.
- Quick summary: View your active brand name, target audience, industry, and the specific tone of voice instructions currently in use.
- Edit / Create New: This button allows you to modify the current settings.
- To update: Edit the fields and select “Save & Activate” to refresh the current profile.
- To branch out: Edit the fields and select “Save as New Preset” to create a separate brand identity while keeping the original intact.
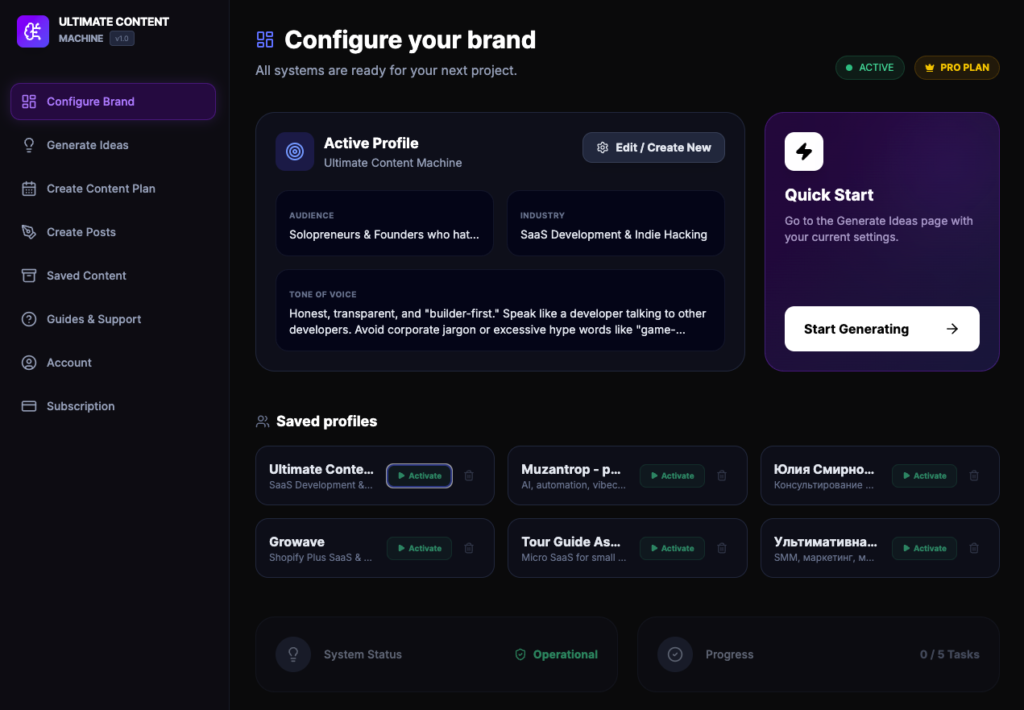
Quick Start: Idea Generation
The Quick Start card is designed to minimize the time between configuration and creation.
- Action: Click the Start Generating button to jump directly to the Generate Ideas tab.
- How it works: The system automatically carries over all parameters from your Active Profile. You won’t need to re-enter your niche or audience details—the AI is already primed to brainstorm relevant topics for you.
Managing Saved Profiles
The Saved Profiles section allows you to organize and toggle between different projects, such as your personal brand or client accounts.
- Switching profiles: Click the Activate button on any profile card to make it the primary “Active Profile.”
- Deleting profiles: Use the trash icon to remove presets you no longer need.
- Editing an existing preset:
- Locate the preset in the Saved Profiles list.
- Click Activate to load it into the top block.
- Click the Edit / Create New button in the Active Profile block to begin making changes.
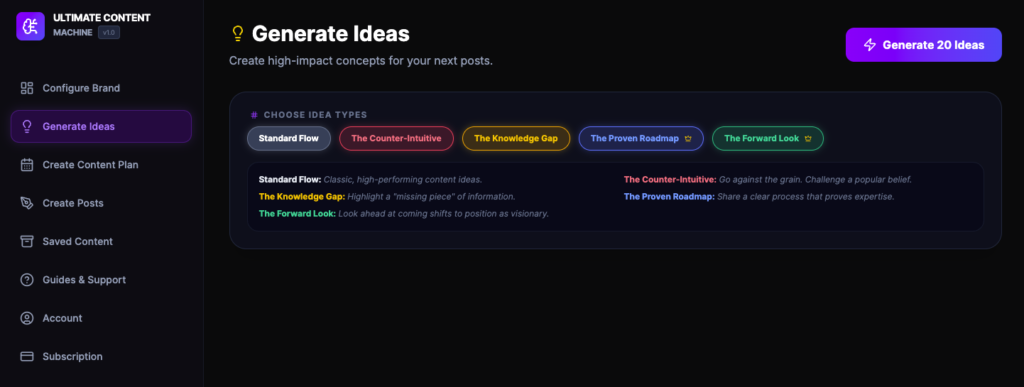
2. The Ideation Engine: Generating 20 Ideas
The Generate Ideas page allows you to customize the “angle” of your content. Instead of generic suggestions, UCM uses specific psychological and marketing frameworks to ensure your ideas stand out in a crowded feed.
Choosing Your Idea Types
You can select one, several, or all available idea types. UCM will always generate a total of 20 ideas, split equally among the types you have selected.
- Standard Flow: Provides classic, high-performing content ideas tailored to your niche.
- The Counter-Intuitive: Focuses on “going against the grain” by challenging popular beliefs to spark engagement.
- The Knowledge Gap: Highlights a “missing piece” of information your audience needs, positioning you as a helpful resource.
- The Proven Roadmap (Pro): Shares clear, step-by-step processes that prove your expertise and build trust.
- The Forward Look (Pro): Positions you as a visionary by looking ahead at coming shifts and trends in your industry.
Pro Tip: If you select all five types, UCM will generate 4 unique ideas for each category, giving you a diverse range of content angles to choose from.
How to Generate
- Toggle Your Preferences: Click the buttons in the Choose Idea Types block to activate or deactivate specific frameworks.
- Review Descriptions: As you select a type, helpful notes will appear below the buttons to explain exactly how that framework will influence the AI’s output.
- Run the Engine: Click the Generate 20 Ideas button in the top right corner.
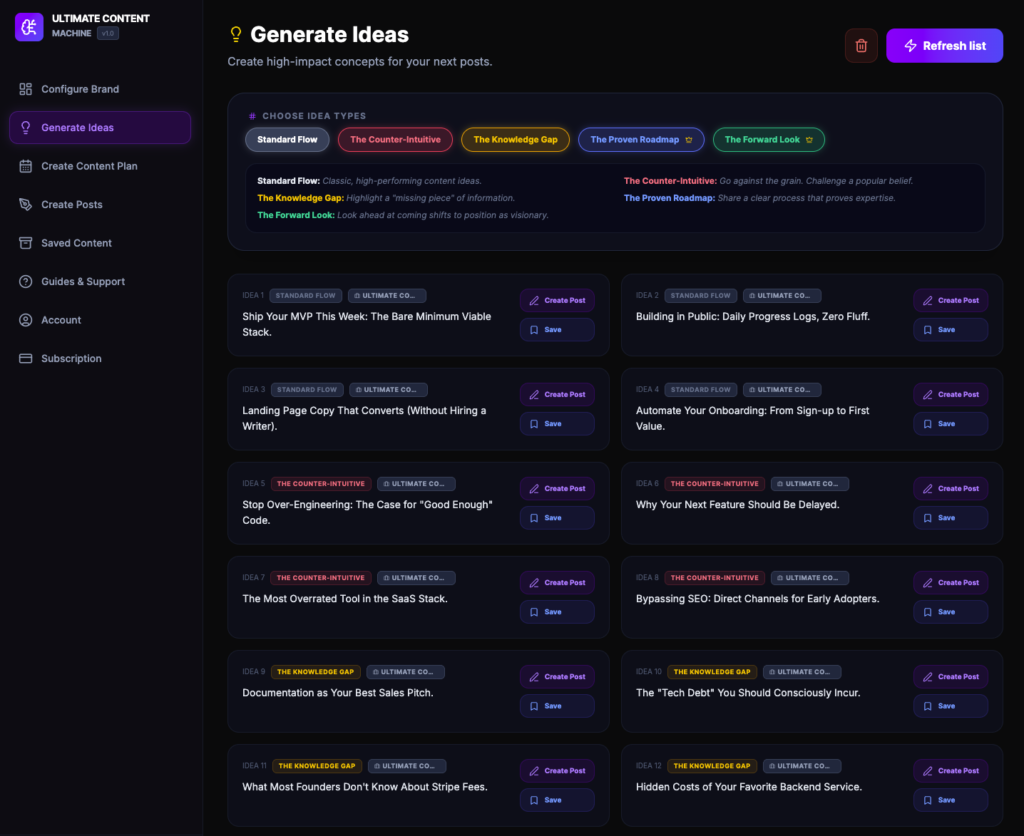
Managing Your Generated Ideas
Every idea card acts as a standalone unit of inspiration. Here is how you can interact with them:
Navigation & Actions
- Create Post: Clicking this button moves you directly to the Create Posts page. The system will automatically carry over the selected idea as the prompt, saving you from copying and pasting manually.
- Save Idea: If you aren’t ready to write yet, click Save. This stores the idea in your Saved Content tab for future use.
- Brand Badge: Each card features a clear badge displaying the Brand Name used for generation. This ensures you always know which “persona” was active when the idea was created.
Cleaning & Refreshing
If the current list has served its purpose, or you want a fresh start:
- Refresh List: Not quite feeling the current selection? Click Refresh List to trigger a new generation cycle based on your selected types.
- Delete All: If you want to clear your workspace entirely, use the Delete All option.
Expert Tip: Before refreshing or deleting, make sure to Save any ideas that caught your eye! Once the list is cleared or refreshed, unsaved ideas cannot be recovered.
Why the Brand Badge Matters
Because the Ultimate Content Machine allows you to manage multiple identities (for Pro Plan users), the badge serves as a visual safeguard. It prevents you from accidentally creating a “Counter-Intuitive” post for your corporate SaaS using the “witty and direct” tone of your personal blog.
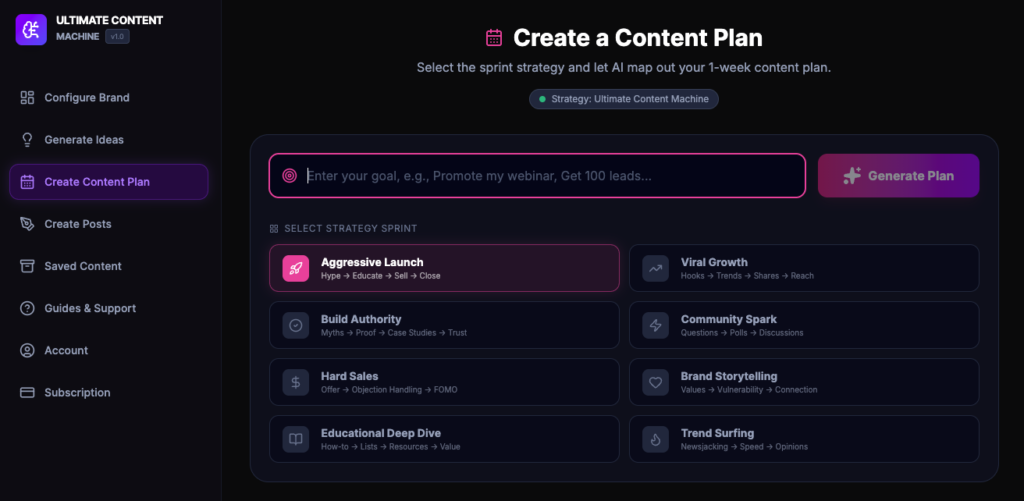
3. Designing Your Weekly Content Plan
This page allows you to map out exactly what to post for the next week. By combining your Active Brand Profile with a specific objective, UCM creates a cohesive narrative rather than a series of random updates.
Define Your Goal
The first step is telling the AI what you want to achieve this week. A clear goal leads to high-conversion topics.
- Action: Enter your objective in the goal input field.
- Examples of strong goals:
- “Promote my new SaaS webinar and get 50 sign-ups.”
- “Establish authority in the AI automation niche by sharing technical insights.”
- “Build hype for the upcoming ‘Content Machine’ launch next Monday.”
- “Re-engage past clients by showcasing new portfolio results.”
Select a Strategy Sprint
Choose one of the 8 available strategies to dictate the “vibe” and structure of your week. Each sprint follows a specific psychological flow:
- Aggressive Launch: A high-energy sequence (Hype → Educate → Sell → Close).
- Viral Growth: Focused on high-reach elements like hooks and trending topics.
- Build Authority: Uses myths, proof, and case studies to establish trust.
- Community Spark: Drives engagement through questions, polls, and discussions.
- Hard Sales: Direct conversion focus using offers, objection handling, and FOMO.
- Brand Storytelling: Focuses on values, vulnerability, and personal connection.
- Educational Deep Dive: Provides massive value through how-to guides and resources.
- Trend Surfing: Leverages “newsjacking” and current industry opinions for speed.
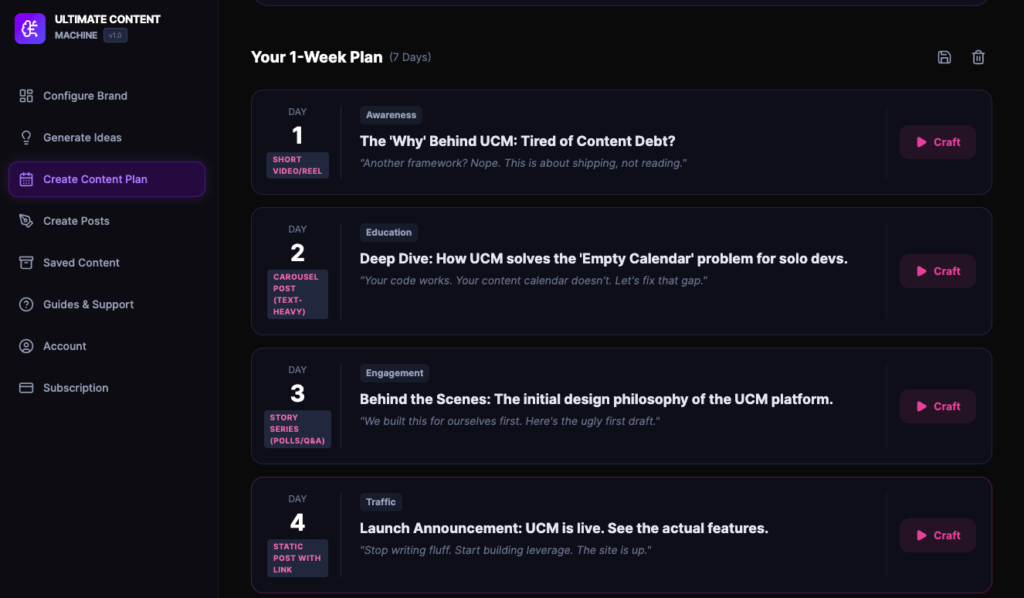
The Generated Plan: What’s Inside?
Once you click Generate Plan, UCM will produce a 7-Day Strategy. Each day includes:
- The Topic: A specific headline or theme for the day.
- Content Format: Suggestions like “Short Video/Reel,” “Carousel Post,” or “Static Post with Link.”
- The Angle: A brief explanation of why this post works for that day’s stage of the sprint.
Plan Management
- Craft: Found on each day card, this button sends the topic directly to the Create Posts tab to start writing.
- Save: Click the floppy disk icon at the top right of the plan to store the entire 7-day sequence in your Saved Content tab.
- Delete: Use the trash icon to clear the current plan if you want to try a different strategy or goal.
4. Refining Your Content Output
UCM provides granular control over how your content is written. By selecting the right combination of type, platform, and formula, you ensure that every post serves a specific purpose in your marketing funnel.
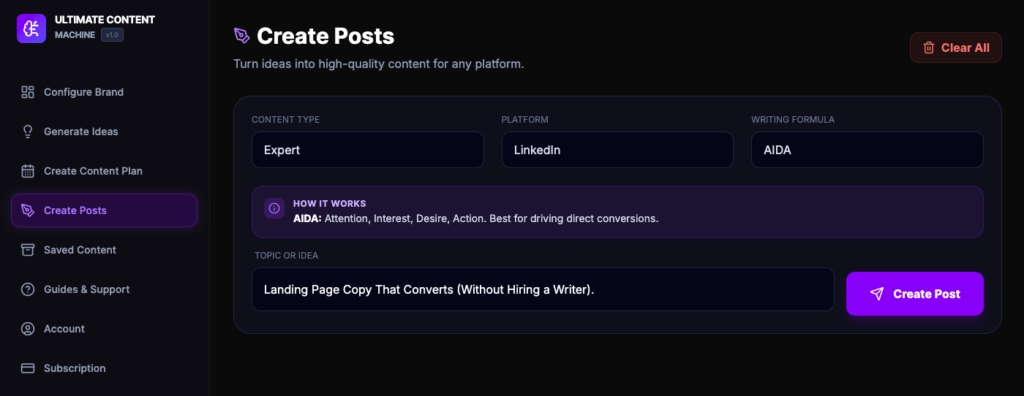
Core Configuration Settings
To generate a post, configure the following three parameters:
- Content Type: Defines the “intent” of the post.
- Expert: Educational content that builds authority.
- Selling: Direct promotional copy designed to convert.
- Personal (Pro): Relatable stories to build a human connection.
- Case Study (Pro): Evidence-based results to prove your value.
- Discussion (Pro): Question-based content to spark engagement.
- Platform: Tailors the length, formatting, and “vibe” to a specific social network. Options range from LinkedIn and Telegram to YouTube Scripts (Pro) and Blog Posts (Pro).
- Writing Formula: The psychological structure of your post. UCM uses industry-standard frameworks to ensure your writing is persuasive.
Master the Writing Formulas
Understanding these formulas allows you to choose the best “path” for your message:
| Formula | Structure & Use Case | Best For… |
| AIDA | Attention, Interest, Desire, Action | Direct conversions and sales. |
| PAS (Pro) | Problem, Agitation, Solution | Addressing audience pain points. |
| BAB (Pro) | Before, After, Bridge | Visualizing results and transformations. |
| Storytelling | Hook → Conflict → Resolution | Building trust and emotional rapport. |
| How-to | Step-by-step instructional guide | Establishing authority and expertise. |
| 4U (Pro) | Urgent, Unique, Useful, Ultra-specific | Catchy headlines and high-engagement hooks. |
| FAB (Pro) | Features, Advantages, Benefits | Product showcases and feature launches. |
The Idea Input & Execution
- Topic or Idea: This field is the “seed” for your post.
- Automatic Sync: If you clicked Create Post from an idea card or Craft from your content plan, this field will already be filled with your selected topic.
- Manual Entry: You can also type in any custom idea, news item, or thought you want the AI to expand upon.
- Create Post: Click the purple button to launch the neural engine. UCM will cross-reference your Brand Profile, the selected Platform, and the Writing Formula to generate a polished draft.
Pro Tip: Notice the “How it Works” information box in the center of your screen. It dynamically updates based on your selected Writing Formula to remind you of the specific psychological angle the AI is taking.
Managing Your Generated Content
The Preview Block provides a clear look at your post alongside several management tools to help you move from draft to published:
Top Actions
- Save for later: Click the bookmark icon to store this specific draft in your Saved Content tab. This is ideal for building a backlog of posts before a scheduled launch.
- Share: Use the share icon to send this draft to external platforms or team members.
- Copy: One-click copy to your clipboard, allowing you to paste the content directly into your chosen social media platform.
Content Meta-Data (Badges)
At the top of the preview, you will see four badges that confirm the logic used to create the post:
- Brand Badge: Displays the active profile (e.g., Ultimate Content Machine) to ensure the tone matches your project.
- Content Type: Confirms the intent (e.g., Expert).
- Platform: Confirms the formatting style (e.g., LinkedIn).
- Formula: Confirms the psychological structure used (e.g., AIDA).
Refining and Cross-Platform Tailoring
One of the most powerful features of the Ultimate Content Machine is the ability to rapidly iterate on a single idea.
- Iterate with One Click: If you like the idea but want a different “vibe,” simply change the Writing Formula or Content Type and click Create Post again.
- Cross-Platform Strategy: After generating a LinkedIn post, you can switch the Platform to Instagram or Telegram and hit Create Post to get a version of the same idea tailored specifically for those audiences.
- Clear All: If you want to start fresh with a completely new topic, click the Clear All button in the top right to reset your workspace.
Pro Tip: Use the Copy feature to move your draft into a Google Doc or your website CMS for final formatting if you are generating a long-form Blog Post (Pro).
5. Library: Saved Content
The Saved Content page is the central repository for everything you have brainstormed, drafted, or planned. To keep your workspace clean, the library is divided into three specialized tabs.
Saved Ideas Tab
This is your “inspiration bank.” It stores the raw concepts you liked from the Generate Ideas tab but weren’t ready to write yet.
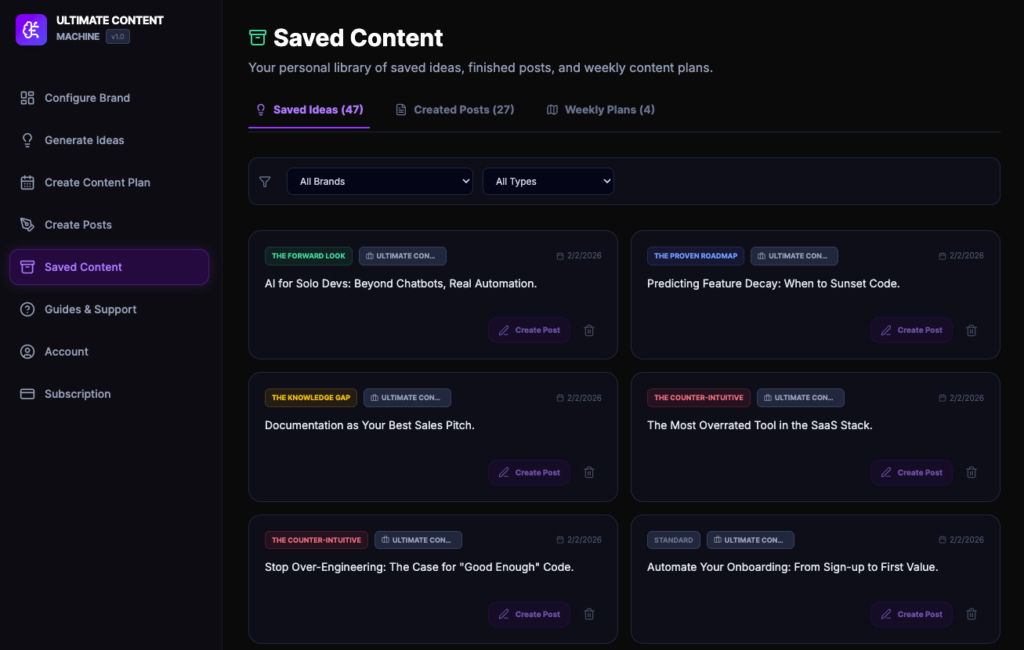
- Card Details: Each card displays the original Idea Type (e.g., The Forward Look, Counter-Intuitive), the Brand Profile used, and the date it was saved.
- Actions:
- Create Post: Instantly move the idea into the Create Posts editor.
- Delete: Remove the idea if it no longer fits your strategy.
- Filtering: Use the dropdowns to filter ideas by Specific Brand or Idea Type to find the right spark for your current session.
Created Posts Tab
This tab houses all the finished drafts you have generated in the Create Posts section.
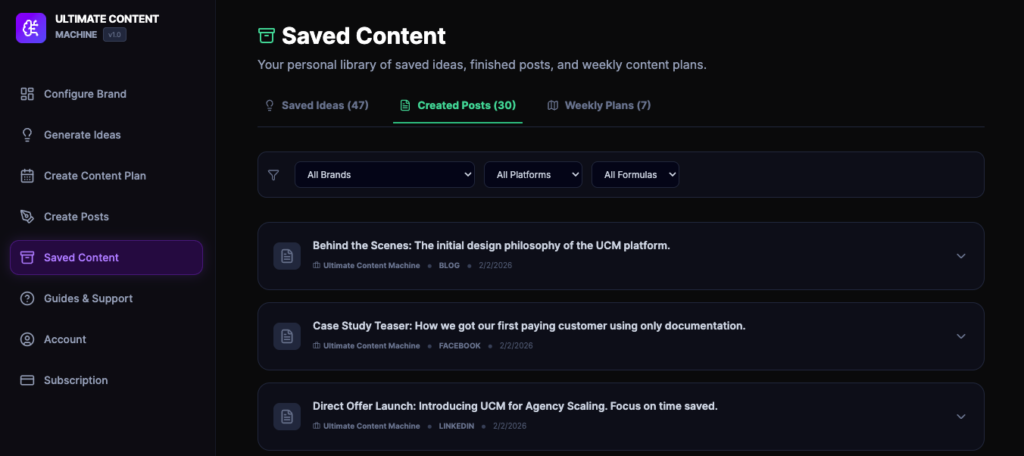
- Organization: Posts are displayed as expandable rows, showing the headline, the associated Brand, the targeted Platform (e.g., Blog, Facebook, LinkedIn), and the save date. Clicking the down button expands the crated post card with full post content, badges with post metadata, and buttons to copy and delete the post.
- Multi-Platform Management: Use the Brands, Platforms, and Formulas filters to quickly locate content intended for specific social networks or writing styles.
Weekly Plans Tab
Your strategic roadmap lives here. This tab saves the full 7-day sequences you developed in the Create Content Plan section.
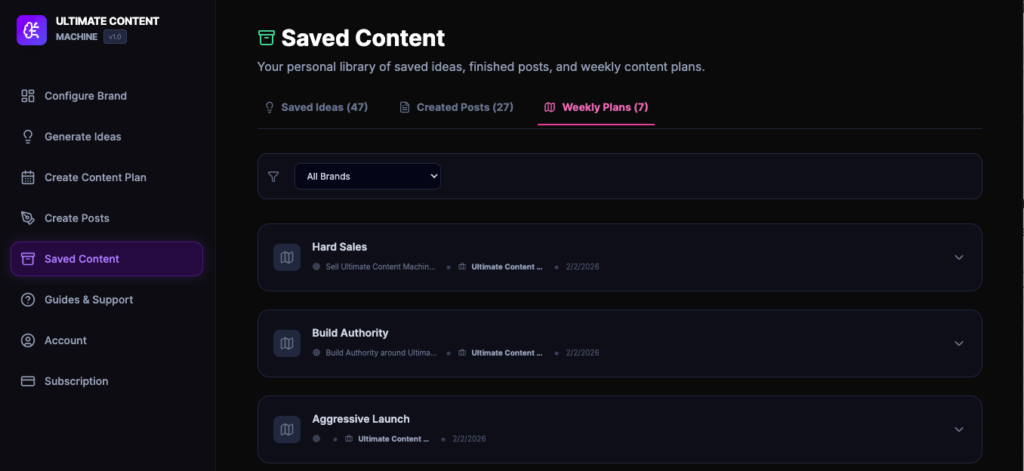
- Strategy Snapshot: Each plan is labeled by its Sprint Type (e.g., Hard Sales, Build Authority, Aggressive Launch).
- Overview: The row displays the primary goal of the plan and the brand it belongs to.
- Detailed View: Click the chevron on any plan row to expand and view the full 7-day breakdown of topics and formats.
Mastering Your Library
- Global Brand Filtering: Every tab includes a Brand Filter. This is essential for power users and agency owners who need to isolate content for one client without seeing another’s.
- Historical Tracking: The date stamps on every item help you track your content volume over time and ensure you aren’t repeating the same “Counter-Intuitive” angle too frequently.