If you manage documentation, technical writing, or AI training materials, you know the drill. You need to explain a new software feature. That means taking a screenshot, opening it in an editor like Snagit or Canva, or maybe even in the macOS Preview app (damn it), adding a colored box, a tooltip, typing some text, exporting it, and uploading it to your help center.
When you have to do this fifty times a week, that context-switching becomes exhausting.
When I first started working on the documentation project for my current company, the pre-existing screenshots looked pretty standard: the usual bright red arrows and basic boxes. To elevate them, I transitioned my workflow into Canva, spending extra time adding custom boxes, bullet points, and sleek arrows. While the result was much better, the constant exporting and uploading was a massive time sink.
By moving the annotation process directly into the browser, I was able to cut my screenshot workflow time entirely in half.
Ultimately, I decided to build a dedicated tool to solve this exact problem—turning operational bottlenecks into a functional, native-feeling workflow.
So, as a side project, I built Annotator Pro.
Instead of acting as a traditional screen-capture tool, Annotator Pro uses the HTML5 Canvas API and Fabric.js to drop an invisible sheet of digital glass directly over the live webpage. This allows me to draw, drag, resize, and style elements before the camera snaps.
To keep the interface clean and prevent it from obscuring the page I'm trying to capture, I built the toolset into a compact, dark-mode dropdown UI that floats at the bottom of the screen:

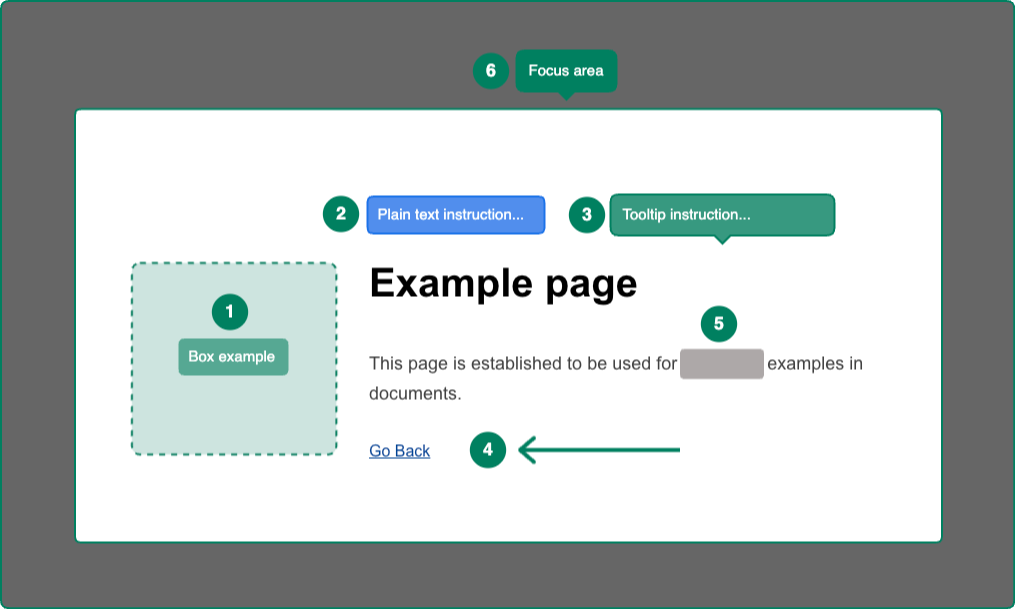
The Annotator Pro Toolkit
- ✂️ Crop Area: Define the exact section of the webpage you want to capture. The tool mathematically slices your final image down to these specific coordinates before export.
- 🔦 Focus (Spotlight): Drops a cinematic shadow over the entire webpage while punching a crystal-clear, resizable hole over your target element. It completely removes background distractions.
- ❶ Badge: An auto-incrementing numbering tool. Click the canvas to drop a "1", click again for a "2", and so on. It is an absolute lifesaver for outlining multi-step tutorials.
- 💬 Text & Tooltip: Standard text boxes and directional tooltips equipped with smart padding. The tooltip automatically calculates a perfectly centered directional arrow that can be toggled to point Top, Bottom, Left, or Right, mimicking native software popovers.
- 🌍 AI Translation: If you maintain localized documentation, manually translating screenshots is a nightmare. I integrated a one-click translation module directly into the canvas. Select any text or tooltip, pick a target language from the dynamic settings menu, and the text translates instantly.
Fun Fact: The AI Translation module uses a public Google Translate endpoint, meaning you don't have to set up a Google Cloud billing account or paste in any API keys. It works right out of the box!
- ↗️ Arrow: A modern, rounded chevron pointer. Unlike standard canvas shapes that warp or get "fat" when you stretch them, this arrow mathematically recalculates its scaling so the pointer remains perfectly sharp and proportional.
- ⬛ Redact: The standard for administrative privacy. Drops an opaque, solid block to instantly hide sensitive customer emails, order numbers, or internal IDs.
- 🟦 Box: Draws clean, customizable highlight rectangles. You can adjust the border radius for softer corners, switch between solid and dashed lines, and apply semi-transparent fills.
The Global Frame & Settings
Every tool is powered by a decoupled dynamic settings section that appears when you select an object. Instead of a single color picker, you have independent controls for Text Color, Body Fill, and Borders.
But you aren't just limited to the inside of the screenshot. If you click the empty canvas background, you access the Page Frame settings. When you export the image, the extension acts as a digital darkroom on the fly: cutting out the outer corners to make them truly transparent, and applying a customizable outer border wrap to the entire image.
A Persistent Workflow
The biggest time-saver has been bypassing the traditional "Downloads" folder entirely. I integrated the modern Clipboard API, so clicking "Copy" processes the cropped, framed image and sends it straight to my clipboard for immediate pasting into Slack, Jira, or a help center draft.
I also built the extension to maintain a persistent session. When you click Save or Copy, the toolbar immediately returns with all added blocks in their place. If you spot a typo in your tooltip after copying it, you don't have to start over. It's tied to chrome.storage.local, permanently remembering my preferred border radiuses, opacities, and color codes across browser sessions.
To take this a step further, I recently added a Template Save/Load function. If you have a specific layout of badges, highlights, and tooltips that you use weekly, you can export the entire canvas as a lightweight .json file. Next time, simply upload the template and all your customized objects snap perfectly back into place.
Under the Hood
The technical challenges behind building this were surprisingly fun to solve. Injecting a UI into unpredictable host environments (like complex e-commerce admin dashboards) requires some defensive architecture.
Never rely on standard HTML <a> download tags when building browser extensions. They are frequently blocked inside sandboxed <iframe> environments. Annotator Pro securely routes finalized image data through a background Service Worker to bypass these sandbox restrictions.
To ensure the toolbar survives strict security scripts (like DOMPurify), the icons are built using pure CSS Masks rather than raw <svg> tags. To prevent aggressive global stylesheets from distorting the canvas geometry, the UI is injected directly into the <html> root with isolated resets.
I also tackled the classic "floating toolbar" problem: browser zoom. Zooming in or out on a webpage usually breaks or obscenely scales injected UI elements. I built an Anti-Zoom engine that dynamically calculates the browser's native zoom ratio (window.outerWidth / window.innerWidth) and applies an inverse CSS scale. This guarantees the compact menu stays exactly 100% size and perfectly usable no matter how drastically you zoom the page.
Installation (Developer Mode)
It’s currently completely open-source and respects local privacy (no backend databases or cloud tracking). If you want to load it into your own browser and take it for a spin, I’ve made the code public here: Annotator Pro on GitHub.
Step 1: Get the code
Download the repository as a .zip file and extract it, or clone it via terminal using git clone https://github.com/Muzantrop/annotator-pro.git.
Step 2: Open Extension Settings
Open Google Chrome and navigate to chrome://extensions/.
Step 3: Enable Developer Mode
Toggle on Developer mode in the top right corner of the extensions page.
Step 4: Load the Extension
Click the Load unpacked button in the top left corner and select your extracted annotator-pro folder.
Step 5: Initialize the Canvas
Pin the extension to your toolbar. Navigate to any webpage and click the icon to drop the canvas and start annotating!